


Content Creation · Gear Guide
How to Build a Content Creator Setup Anywhere (Dorm, Apartment, Hotel Room)
You don't need a studio. You need a window, a flat surface, and a phone. The complete guide to building a creator setup that fits in a backpack, works in any room, and produces content that looks like it came from a permanent studio.
The biggest myth in content creation is that you need a dedicated space. A studio with controlled lighting, acoustic panels, a desk permanently set up with a camera, a mic, a ring light, and a backdrop. That setup exists for a reason, and if you have the space and budget, great. But most creators don't. Most creators are working from a dorm room, a shared apartment, a bedroom that doubles as an office, or a hotel room on the road. The space changes, the lighting changes, the background changes, and the "studio" has to come apart and go back together every time.
This guide is for that reality. Everything here fits in a backpack. Everything works with just a phone. Everything can be set up in under 10 minutes and taken down in 2. The result is content that looks clean, sounds clear, and doesn't betray the fact that you shot it on a hotel desk at 11 PM or in the corner of a dorm room between classes.
We'll cover the five elements that make any space look like a studio (lighting, framing, audio, background, and stability), the exact gear list under $150 total, and how to adapt the setup to five common spaces. By the end, you'll have a repeatable system that works anywhere you go.
The Five Elements That Make Any Room a Studio
Get these five right and the room doesn't matter. Miss any one and the content looks amateur regardless of the room.
01
Lighting (The Single Biggest Factor)
Priority: #1 · This alone separates amateur from professional

Window light is free and better than most artificial setups.
Natural window light is free and better than most artificial setups. Sit facing a window (the window should be in front of you or to the side, never behind you). The soft, diffused light from a window produces even, flattering illumination that makes skin look natural and eliminates the harsh shadows that overhead ceiling lights create. This single change upgrades the look of any video or photo more than any piece of equipment you can buy.
When window light isn't available: a small LED panel light ($20 to $40) aimed at the ceiling or a white wall creates a soft bounce light that mimics the window effect. Avoid pointing any light directly at your face. Direct light creates harsh shadows and makes you squint. Bounced light (off a ceiling, a wall, or a white piece of foam board) is always softer and more flattering.
Rule of thumb: if you can see the light source reflected in your eyes in the phone's front camera, the light is in the right position.
02
Framing and Camera Position
Priority: #2 · Where the phone sits changes everything
Phone at eye level or slightly above. Most people prop their phone on a desk, which means the camera is pointing up at their chin and nostrils. This is the "laptop webcam" angle that makes everyone look unflattering. Raise the phone to eye level using a stack of books, a shelf, or a small tripod on a desk. For talking-head content, the camera lens should be at the same height as your eyes or 2 to 3 inches above.
Distance matters. Too close and the wide-angle lens distorts your face (big nose, small ears). Too far and you look lost in the frame. For talking-head video, position the phone 2 to 3 feet from your face. For product shots, 12 to 18 inches. For flat lays, directly overhead at 18 to 24 inches.
Use the 1x lens for talking-head content (not 0.5x, which distorts faces at close range). Use 0.5x only for showing a full room or setup overview.
03
Audio (The Thing Most Creators Ignore)
Priority: #3 · Bad audio loses viewers faster than bad video
The built-in phone mic is acceptable but not good. It picks up room echo, background noise, and sounds thin compared to dedicated microphones. For casual content (stories, reels, short clips), the built-in mic is fine. For anything longer than 60 seconds, a dedicated mic makes a noticeable difference in perceived production quality.
Best budget option: a wireless lavalier mic ($25 to $50). Brands like Hollyland Lark, RODE Wireless ME, and DJI Mic Mini make clip-on wireless mics that plug directly into the phone's Lightning or USB-C port. Clip it to your collar, and the mic picks up your voice cleanly while rejecting room noise. This is the single most impactful audio upgrade for phone-based creators.
Quick room hack: hang a towel or a thick blanket behind the phone (off camera) to absorb echo. Soft surfaces kill reverb. Hard surfaces amplify it.
04
Background (What's Behind You Matters)
Priority: #4 · Clean background = professional perception

Clean the rectangle the camera sees. The rest of the room doesn't matter.
The less clutter, the more professional it looks. You don't need a dedicated backdrop. You need a section of wall, bookshelf, or corner that isn't visually chaotic. Before filming, look at your phone's front camera and evaluate only what appears in the frame. Move anything distracting out of frame. You don't have to clean the whole room. You have to clean the rectangle the camera sees.
Three reliable background formulas: (1) a plain wall with one piece of art or a plant, (2) a bookshelf with books and a few intentional objects, (3) a window with natural light (blurred out by Portrait mode or shallow depth of field). Any of these reads as "intentional" rather than "I filmed this in my messy bedroom."
Hotel room trick: use Portrait mode (video) to blur the background. A generic hotel room becomes an artfully blurred backdrop that could be anywhere.
05
Stability (No Shaky Video, Ever)
Priority: #5 · The foundation for everything above

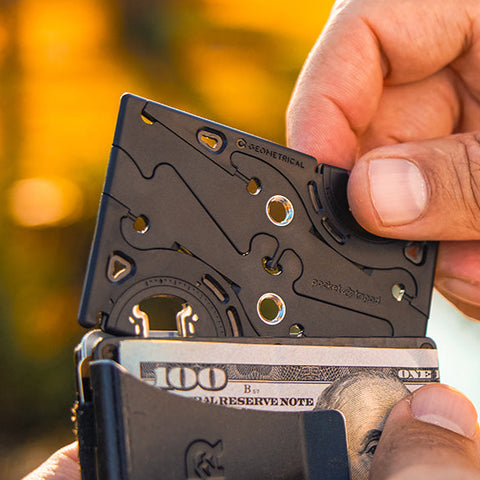
Everything in the Pocket Tripod kit. The tripod itself is credit-card sized.
Handheld looks handheld. Even with optical image stabilization, handheld phone video has a micro-jitter that reads as "casual" at best and "amateur" at worst. For talking-head content, product shots, tutorials, flat lays, and time-lapses, the phone needs to be on something stable. A full-size tripod works at home but doesn't travel. A small tabletop tripod works everywhere but takes up space in a bag.
The Pocket Tripod was built for this exact problem. It's the size of a credit card, lives in your wallet, and holds any phone at any angle on any flat surface. Set it on a desk, a shelf, a nightstand, or a stack of books. It adjusts to the exact angle you need for eye-level framing without the bulk of a traditional tripod. For a creator who works from different spaces, it's the one piece of gear that's always with you.
For overhead flat-lay shots: tape the Pocket Tripod to the underside of a shelf or use a phone clamp arm ($15) attached to a desk edge.
The Complete Portable Gear List (Under $150)
Everything you need to create professional-looking content from any room. All of it fits in a backpack or carry-on.
Total for the full kit: $120 to $190. The essentials alone (phone + Pocket Tripod + mic) run about $75 to $100 and cover 90% of creator needs.
How to Adapt the Setup to Five Common Spaces
Same gear, different rooms. The principles stay the same. The arrangement changes.
🎓 The Dorm Room
Challenge: tiny space, shared with a roommate, no control over wall color or furniture.
Solution: Face your desk toward the window for natural light. Use the bed's headboard wall as your background (hang a small tapestry or a few framed prints to create a clean background zone). Phone on Pocket Tripod on a stack of textbooks at eye level. Lav mic clipped to your shirt. Shoot during daylight hours when possible. Total floor space used: about 3 square feet.
🏠 The Small Apartment / Bedroom
Challenge: multi-purpose room, gear has to come out and go back for each session.
Solution: Pick one corner with window light and a bookshelf or clean wall behind you. That's your "studio corner." Phone on Pocket Tripod on the desk, LED panel bounced off the ceiling for fill, lav mic. Keep all the gear in a small pouch in a desk drawer. Setup time: 5 minutes. Teardown: 2 minutes. The rest of the room doesn't need to change.
🏨 The Hotel Room
Challenge: unfamiliar space, generic decor, unpredictable lighting.
Solution: Use the desk near the window. Open the curtains for natural light. Use Portrait mode video to blur the generic hotel background into an abstract bokeh. Phone on Pocket Tripod on the desk (it came in your wallet, so it's already there). For nighttime content, bounce the LED panel off the white ceiling. Hotel rooms have hard surfaces that amplify echo, so the lav mic is critical here.
☕ The Coffee Shop or Co-Working Space
Challenge: public space, background noise, people walking through frame.
Solution: Best for b-roll, product shots, and lifestyle content (not talking-head). Find a table against a wall or window. Phone on Pocket Tripod aimed at your hands, your coffee, your laptop, or a product. Use the ambient sound as texture (coffee shops sound aspirational in content). For voiceover, record audio separately at home and overlay it in editing. The visual energy of a coffee shop adds production value for free.
🏕 Outdoors (Park, Rooftop, Balcony)
Challenge: wind noise, direct sunlight, nowhere to set the phone.
Solution: Shoot in shade or during golden hour (never direct midday sun on your face). Pocket Tripod on a railing, bench, or table. Lav mic is essential outdoors since the built-in mic picks up every breeze. Face the sun (so it lights you from the front) and keep the background uncluttered. Outdoor content performs well because the natural lighting and environment do 80% of the production work for you.
"The creators with the best content aren't the ones with the best studios. They're the ones who figured out how to make any room work."
The Studio That Fits in Your Wallet
Create Anywhere. No Excuses.
The Pocket Tripod PRO v2 is the only fully adjustable phone tripod that fits in your wallet. 2.3mm thin. Works with any phone, any case. Every angle. Lifetime warranty. Rated 4.8 stars by 9,800+ Kickstarter backers.
Shop Pocket Tripod →Use code CREATOR15 for 15% off your first order
The Real Takeaway
The space doesn't make the creator. The system does. A repeatable setup that you can deploy in any room in under 10 minutes removes the biggest excuse most aspiring creators have: "I don't have a studio." You don't need one. You need a window, a flat surface, a phone, and something to set it on. Everything else is optimization.
Start with lighting and stability. Get those two right and the content immediately looks professional. Add the lav mic when you're ready for video with voiceover. Add the LED panel when you need to shoot at night. Build the system one piece at a time, and by the time you have all five elements dialed in, you'll wonder why you ever thought you needed a dedicated room.
More reading: How to take group photos without asking a stranger · 9 solo self-portrait techniques · How to film yourself when solo traveling.

