
Learn the iPhone time‑lapse workflow—settings, ideal subjects, stabilization tips, and how to adjust playback speed after shooting.
Want to turn minutes or hours into a few seconds of cinematic motion? This guide shows you how to do time‑lapse on iPhone using the built‑in Camera app and an optional editing method for more control. We’ll cover iPhone time‑lapse settings, stability, best subjects, and how to retime your time‑lapse video (iPhone) later.
Quick Start: Built‑in Time‑Lapse (60 seconds)
- Open Camera and swipe to TIME‑LAPSE.

- Choose your lens (0.5× ultra‑wide, 1× wide, or 2×/3× tele, depending on your iPhone).
- Frame the scene. Tip: Use a low, stable surface for dramatic movement in clouds, traffic, or people.
-
Tap and hold to set AE/AF LOCK (locks exposure and focus). Drag up/down to nudge brightness if available.
(Pro tp: enable "Do Not Disturb)
- Press the record button. Let it run uninterrupted.
- Press stop. Your time‑lapse is saved to Photos, automatically sped up by iPhone.
Note: iPhone automatically selects a capture interval based on clip length. For specific speed control, use the editing method below.
Best Setup & Stabilization
Although there is a built-in stabilization algorithm in the Time-lapse mode, subtle movements still get magnified due to being sped up— So stability is everything. Use a solid surface or a tripod/stand for rock‑steady results.
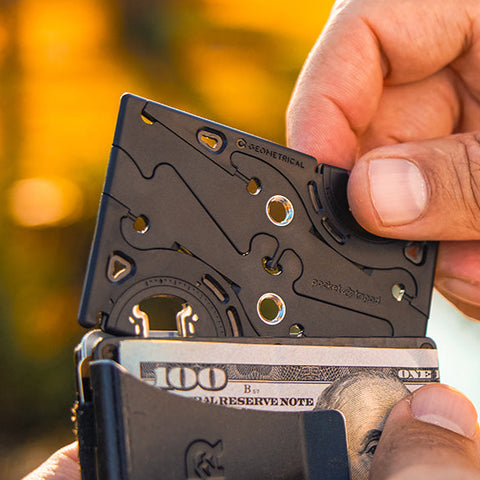
Ultra‑portable option
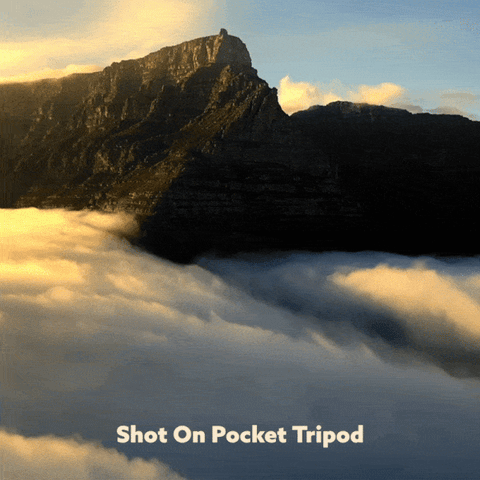
A wallet‑sized stand like Pocket Tripod® PRO v2 gives you precise tilt on any flat surface, lives in your wallet, and can mount to a mini tripod via its 1/4‑20 insert when you need height.

Extra stability tips
- Set the phone on granite, concrete, or a sturdy table. Avoid springy floors and railings.

- Use airplane mode to prevent vibrations from calls/alerts.
- Plug into power for sessions longer than ~30 minutes; close background apps.
- Shield from wind; consider a low angle to reduce shake.
- Use a Bluetooth shutter remote to start/stop without touching the phone.

Great Subjects & Timing
Subject |
Suggested Duration |
Framing Tips |
|---|---|---|
Clouds / Weather |
10–45 minutes | Low angle with foreground interest (trees, skyline). |
Sunset / Golden Hour |
30–120 minutes | Aim for diagonal movement; lock exposure; avoid lens flares. |
City Traffic / Crowds |
15–60 minutes | Include leading lines; raise camera slightly above eye level. |
Shadows / Sun Trails |
1–3 hours | Top‑down or side angle to emphasize changing geometry. |
Construction / Setup |
2–8 hours | Use external power; shoot from a vibration‑free perch. |
Plants Opening |
24 hours | Close‑up with constant artificial light |

Pro tip for sky Time-Lapse:
Highly recommended to use an astronomy app like PlanIt! to predict the position of celestial bodies (sun and the moon) in relation to buildings and terrain.
Pro time for clouds and golden hour Time-Lapse:
As a rule of thumb, you can expect beautiful clouds and colors after a rainstorm, especially if it coincides with a sunset. So check the weather app to see if conditions hint at that. Here's an example:
Pro Controls: Exposure, Focus, Lenses
-
AE/AF LOCK: In time‑lapse, tap‑and‑hold to lock focus and exposure. This prevents flicker from the phone constantly re‑metering as light shifts.

- Manual brightness nudge: After locking, slide up/down to bias exposure slightly brighter/darker if your scene demands it.
- Lens choice: Use wide for low light and broader scenes; ultra‑wide for dramatic motion; tele for compressing distant elements (ensure extra stability).
- White balance consistency: If color shifts, consider locking WB in a third‑party manual app, or keep lighting consistent.
- Low‑light: Keep the phone very steady; iPhone may lengthen exposure automatically. Prefer the 1× lens and avoid heavy digital zoom.
How to Adjust Speed After Shooting (iPhone & Mac)
On iPhone with iMovie
- Open iMovie → + Create Project → Movie.
- Add your time‑lapse clip from Photos.
- Tap the clip → tap the Speed icon (turtle/rabbit) → drag to slow down or speed up.
- Export at your desired resolution.
On iPhone with other editors
Apps like CapCut or LumaFusion offer granular speed ramps and motion blur. Import the time‑lapse, adjust speed (%), and export.
On Mac (iMovie / Final Cut Pro / DaVinci Resolve)
- Import the clip.
- Use Speed/Retime controls to change playback rate (e.g., 200%, 400%).
- Export your final video.
Tip: If your clip looks too fast, slowing it to 50–25% can restore the feel of natural motion; if it looks too slow, increase to 200–800% depending on subject.
Alternative Method: Shoot Regular Video, Then Speed It Up
This gives you full control over the final speed and avoids the auto interval behavior of the built‑in mode.
- In Settings › Camera › Record Video, choose a high frame rate (e.g., 60 fps) and desired resolution.
- Record a static, stable shot for the full duration.
- In your editor, increase speed until motion looks right (e.g., 400–2000%).
Pro Method: Use a pro app that has powerful Time-lapse controls
You might be tempted to search for "best iPhone timelapse app" or something along those lines. The problem with that is that the results are mediocre at best.
Using a more well rounded and powerful app like Pro Camera by Moment is a much better option for a couple of reasons. The layout and capabilities are intuitive for someone with even basic photography knowledge, plus it has cool features like motion blur and light streaks. It's not just the best app for time-lapse but also other photography techniques.

The app itself has great tutorials and instructions so we'll skip that here.
| Method |
Pros |
Cons |
Best For |
|---|---|---|---|
| Built‑in Time‑Lapse | Stabilizes jitters automatically, lightweight files, automatic interval. | Exact speed not settable in‑camera | Quick setups, social clips |
| Record Video + Speed Up | Shoot first without first deciding the length and speed. Speed ramps, easier to mix with other footage | Larger files, more battery and storage. Video will be jittery with no motion blur. | When exact time and speed is critical. |
| Pro Camera App | Precise controls, motion blur, light streaks. Control White balance, shutter speed and more. | Gentle learning curve. You need to decide how long the timelapse should be in advance. | Impressive results. Mastering time-lapse photography on the go. |
Pre‑Shoot Checklist
- Stable support (stand/tripod) and a level, low‑vibration surface
- Frame with foreground interest and visible motion
- AE/AF LOCK set; brightness nudged if needed
- Power plan: battery above 60% or external power
- Airplane mode on; screen brightness reduced slightly
- Optional: Bluetooth shutter remote for touch‑free control
FAQs
Where are the iPhone time‑lapse settings?
In the Camera app, swipe to TIME‑LAPSE. iPhone chooses the capture interval automatically. You can lock exposure/focus (AE/AF) and bias brightness. For exact speed choices, shoot regular video and adjust speed in editing.
How long should I record?
It depends on subject: clouds (10–45 min), crowds (15–60 min), sunsets (30–120 min). Longer recordings produce more dramatic motion—use power and a very stable setup.
Can I change the time‑lapse speed later?
Yes—use iMovie, CapCut, or LumaFusion to retime your clip faster or slower and export at your preferred resolution.
What’s the best tripod for iPhone time‑lapse?
Anything rock‑solid works. For everyday carry and travel, a wallet‑sized stand you always have with you often beats bulky gear you leave behind. For height, attach to a mini or full‑size tripod via 1/4‑20.
Make Smoother Time‑Lapses Anywhere
Carry a tripod that’s always with you. Pair Pocket Tripod® PRO v2 with a Bluetooth shutter remote for shake‑free starts and stable, repeatable angles.

